
เรียนรู้วิธีควบคุม Arduino ด้วย Windows Application ที่เขียนจาก Visual Basic 2010 Express ในระบบปฏิบัติการ Windows โดยเราจะควบคุม การ เปิดปิดไฟ จาก Windows Application ชื่อ Arduino LED 4 ส่งค่าผ่าน Serial Port ไปยัง บอร์ด Arduino และ เมื่อบอร์ด Arduino อ่านค่าได้ ให้แสดงผล ตามโค้ดที่เราเขียนไว้ ด้วย หลอดไฟ LED 12 V
1. Arduino UNO R3
2. Sensor Shield V 5.0
3. สาย Jumper Female to Female ยาว 20cm.
4. Relay 4 Channel DC 5V High Level Trigger
5. รางถ่าน AA 8 ก้อน 12 โวลต์
6. แจ๊กขั้วถ่าน 9 โวลต์ สำหรับ Ardiuno
7. สายไฟแดงดำ ขนาด 22AWG
8. หลอดไฟ LED 12 V
ขั้นตอนการทำงาน
1. เชื่อมต่อ Relay เข้ากับ Sensor Shield V5.0
Shield <-> Relay
4 <-> IN4
5 <-> IN3
6 <-> IN2
7 <-> IN1
G <-> GND
V <-> VCC

2.อัพโหลดโปรแกรม เข้า บอร์ด Arduino
int ledPin1 = 7;
int ledPin2 = 6;
int ledPin3 = 5;
int ledPin4 = 4;
void setup() {
Serial.begin(9600);
pinMode(ledPin1, OUTPUT);
pinMode(ledPin2, OUTPUT);
pinMode(ledPin3, OUTPUT);
pinMode(ledPin4, OUTPUT);
digitalWrite(ledPin1, LOW);
digitalWrite(ledPin2, LOW);
digitalWrite(ledPin3, LOW);
digitalWrite(ledPin4, LOW);
}
void loop() {
while (Serial.available() == 0);
int val = Serial.read() - '0';
if (val == 1) {
digitalWrite(ledPin1, HIGH);
}
else if (val == 2) {
digitalWrite(ledPin2, HIGH);
}
else if (val == 3) {
digitalWrite(ledPin3, HIGH);
} else if (val == 4) {
digitalWrite(ledPin4, HIGH);
} else if (val == 5) {
digitalWrite(ledPin1, LOW);
} else if (val == 6) {
digitalWrite(ledPin2, LOW);
} else if (val == 7) {
digitalWrite(ledPin3, LOW);
} else if (val == 8) {
digitalWrite(ledPin4, LOW);
} else if (val == 9) {
digitalWrite(ledPin1, LOW);
digitalWrite(ledPin2, LOW);
digitalWrite(ledPin3, LOW);
digitalWrite(ledPin4, LOW);
} else {
}
Serial.flush();
}

https://drive.google.com/open?id=1d70B2sGeEKkT3OC-HuQr7yQgcFI9CbTq
คลิก Download

คลายซิป แล้ว คลิกที่ ไฟล์ setup เพื่อทำการติดตั้งโปรแกรม


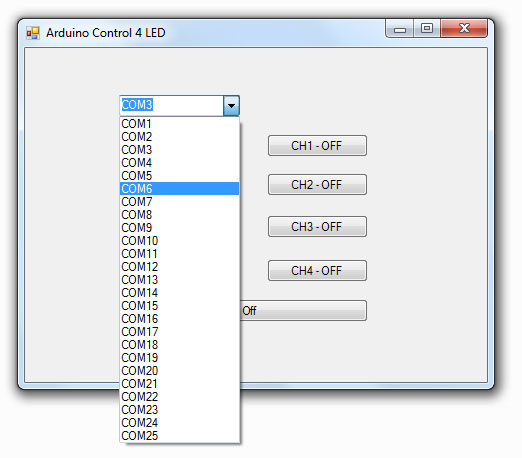
หน้าตาของโปรแกรม

ตรวจสอบว่า Arduino ของเราใช้ Com Port อะไร เช่น ในตัวอย่างเป็น COM6
(แต่ละเครื่อง Com Port จะไม่เหมือนกัน ถ้าเลือกไม่ถูกต้องโปรเจคจะไม่ทำงาน)
คลิกเลือก ดรอปดาวน์ Com Port ให้ตรงกับ Port ของ Arduino ของเรา ในตัวอย่างก็คือ COM6

โค้ด Visual Basic
Imports System.IO
Imports System.IO.Ports
Imports System.Threading
Public Class Form1
Shared _continue As Boolean
Shared _serialPort As SerialPort
Private Sub Form1_Load(ByVal sender As System.Object, ByVal e As System.EventArgs) Handles MyBase.Load
Me.ComboBox1.Items.Add("COM1")
Me.ComboBox1.Items.Add("COM2")
Me.ComboBox1.Items.Add("COM3")
Me.ComboBox1.Items.Add("COM4")
Me.ComboBox1.Items.Add("COM5")
Me.ComboBox1.Items.Add("COM6")
Me.ComboBox1.Items.Add("COM7")
Me.ComboBox1.Items.Add("COM8")
Me.ComboBox1.Items.Add("COM9")
Me.ComboBox1.Items.Add("COM10")
Me.ComboBox1.Items.Add("COM11")
Me.ComboBox1.Items.Add("COM12")
Me.ComboBox1.Items.Add("COM13")
Me.ComboBox1.Items.Add("COM14")
Me.ComboBox1.Items.Add("COM15")
Me.ComboBox1.Items.Add("COM16")
Me.ComboBox1.Items.Add("COM17")
Me.ComboBox1.Items.Add("COM18")
Me.ComboBox1.Items.Add("COM19")
Me.ComboBox1.Items.Add("COM20")
Me.ComboBox1.Items.Add("COM21")
Me.ComboBox1.Items.Add("COM22")
Me.ComboBox1.Items.Add("COM23")
Me.ComboBox1.Items.Add("COM24")
Me.ComboBox1.Items.Add("COM25")
SerialPort1.Close()
SerialPort1.PortName = ComboBox1.Text
SerialPort1.BaudRate = 9600
SerialPort1.DataBits = 8
SerialPort1.Parity = Parity.None
SerialPort1.StopBits = StopBits.One
SerialPort1.Handshake = Handshake.None
SerialPort1.Encoding = System.Text.Encoding.Default
End Sub
Private Sub ButOn1_Click(ByVal sender As System.Object, ByVal e As System.EventArgs) Handles ButOn1.Click
SerialPort1.Open()
SerialPort1.Write("1")
SerialPort1.Close()
End Sub
Private Sub ButOn2_Click(ByVal sender As System.Object, ByVal e As System.EventArgs) Handles ButOn2.Click
SerialPort1.Open()
SerialPort1.Write("2")
SerialPort1.Close()
End Sub
Private Sub ButOn3_Click(ByVal sender As System.Object, ByVal e As System.EventArgs) Handles ButOn3.Click
SerialPort1.Open()
SerialPort1.Write("3")
SerialPort1.Close()
End Sub
Private Sub ButOn4_Click(ByVal sender As System.Object, ByVal e As System.EventArgs) Handles ButOn4.Click
SerialPort1.Open()
SerialPort1.Write("4")
SerialPort1.Close()
End Sub
Private Sub ButAllOff_Click(ByVal sender As System.Object, ByVal e As System.EventArgs) Handles ButAllOff.Click
SerialPort1.Open()
SerialPort1.Write("9")
SerialPort1.Close()
End Sub
Private Sub ButOff1_Click(ByVal sender As System.Object, ByVal e As System.EventArgs) Handles ButOff1.Click
SerialPort1.Open()
SerialPort1.Write("5")
SerialPort1.Close()
End Sub
Private Sub ButOff2_Click(ByVal sender As System.Object, ByVal e As System.EventArgs) Handles ButOff2.Click
SerialPort1.Open()
SerialPort1.Write("6")
SerialPort1.Close()
End Sub
Private Sub ButOff3_Click(ByVal sender As System.Object, ByVal e As System.EventArgs) Handles ButOff3.Click
SerialPort1.Open()
SerialPort1.Write("7")
SerialPort1.Close()
End Sub
Private Sub ButOff4_Click(ByVal sender As System.Object, ByVal e As System.EventArgs) Handles ButOff4.Click
SerialPort1.Open()
SerialPort1.Write("8")
SerialPort1.Close()
End Sub
Private Sub ComboBox1_SelectedIndexChanged(ByVal sender As System.Object, ByVal e As System.EventArgs) Handles ComboBox1.SelectedIndexChanged
SerialPort1.PortName = ComboBox1.Text
End Sub
End Class
แล้วทดสอบการทำงาน ดูผลลัพธ์ ที่ LED ของ Relay
โดย ที่ PWR (สีแดง) จะติดตลอดเวลา และ LED1-4 (สีเขียว) จะติดเมื่อเราคลิกที่ปุ่มต่างๆของ Windows Application

4. ตัดแจ๊กขั้วถ่านออก แล้วเชื่อมต่อ แจ๊ก เข้ากับ รางถ่าน แล้วจึงเสียบเข้า บอร์ด Arduino เพื่อเป็นไฟเลี้ยงบอร์ด


5. ใส่ถ่านขนาด AA จำนวน 8 ก้อน เข้าที่รางถ่าน แล้วเชื่อมต่อ รางถ่าน + Relay และ หลอดไฟ


ผลลัพธ์ โปรเจค Arduino เปิดปิดไฟ ด้วย Windows Application