
ในโปรเจคนี้เราจะสร้างเว็บเซิร์ฟเวอร์ ESP8266 โดยใช้ NodeMCU V3 กับ เซ็นเซอร์ DHT22 แสดงอุณหภูมิและความชื้น
อุปกรณ์ที่ใช้
1. NodeMCU V3 CH340G Lua WIFI ESP8266 ESP-12E
2. Micro USB Cable Wire 1m for NodeMCU
3. DHT22/AM2302 เซ็นเซอร์วัดอุณหภูมิและความชื้น
4. รีซิสเตอร์ 4.7K Ohm 1/4W 5%
5. Breadboard 8.5CM x 5.5CM 400 holes (โฟโต้บอร์ด) จำนวน 2 ชิ้น
6. Jumper (M2M) cable 10 cm
7. รางถ่าน AA 6 ก้อน 9 โวลต์
8. แผ่นอะคริลิคใส ขนาด 10 x 12.5 เซนติเมตร
1. ประกอบ วงจร
ประกอบ Breadboard 2 ชิ้น ลงบน แผ่นอะคริลิคใส ขนาด 10 x 12.5 เซนติเมตร
และ ประกอบ NodeMCU V3 ลงบน Breadboard
และ ประกอบ NodeMCU V3 ลงบน Breadboard

ประกอบวงจรตามรูป


เชื่อมต่อรางถ่าน เข้ากับ Breadboard
โดยสายสีแดง ไฟ+ ไปยังขา VIN ของ NodeMCU V3 และ สายสีดำ ไฟ- ไปยัง กราวด์ (GND) ของ Breadboard

2. ตรวจสอบการติดตั้งไดร์เวอร์ ของ NodeMCU V3
เสียบสาย USB จากคอมพิวเตอร์ เข้ากับ NodeMCU V3

ตรวจสอบการติดตั้งไดร์เวอร์ ของ NodeMCU V3
โดย คลิกขวา Computet -> Properties

คลิกที่ Device Manager

ที่ Ports (COM & LPT) จะพบ ไดร์เวอร์ ของ NodeMCU V3
ในตัวอย่างเป็น USB -SERIAL CH340 (COM8)

(ถ้าไม่พบให้ทำการติดตั้งไดร์เวอร์ก่อน)
ตัวอย่างการติดตั้งไดร์เวอร์ ชิฟ CH340G
3. ติดตั้ง แพลตฟอร์ม ESP8266
การจะใช้ NodeMCU ได้นั้น จำเป็นต้องติดตั้ง แพลตฟอร์ม ESP8266 เพื่อ ทำการติดต่อ ระหว่าง Arduino IDE กับ NodeMCU
ลิงค์ : ขั้นตอนการติดตั้ง แพลตฟอร์ม ESP8266
https://robotsiam.blogspot.com/2017/06/esp8266-platform-nodemcu.html
4. ติดตั้ง Library ของ DHT Sensor
การจะใช้ DHT22/AM2302 เซ็นเซอร์วัดอุณหภูมิและความชื้น ได้นั้น จำเป็นต้องติดตั้ง ไลบรารี DHT เพิ่มเข้าไปยัง Arduino IDE ของเรา
ลิงค์ : การติดตั้ง Library ของ DHT Sensor
5. อัพโหลด โค้ด
การกำหนดชื่อ Pin นั้น สามารถใช้ได้ 2 แบบ คือ แบบที่ 1 จะ อ้างตามชื่อ Pin บนบอร์ด NodeMCU V3 เป็น D1 หรือ แบบที่ 2 เป็นการเทียบขา ตามรูปด้านล่าง โดยเลือกใช้ Pin เป็น 5 ก็ได้เช่นกัน

เสียบสาย USB จากคอมพิวเตอร์ เข้ากับ NodeMCU V3

เปิดโปรแกรม Arduino IDE ก๊อบปี้ โค้ด ด้านล่างไปยัง โปรแกรม ของ Arduino IDE
// Including the ESP8266 WiFi library
#include <ESP8266WiFi.h>
#include "DHT.h"
// Uncomment one of the lines below for whatever DHT sensor type you're using!
//#define DHTTYPE DHT11 // DHT 11
//#define DHTTYPE DHT21 // DHT 21 (AM2301)
#define DHTTYPE DHT22 // DHT 22 (AM2302), AM2321
// Replace with your network details
const char* ssid = "YOUR_NETWORK_NAME";
const char* password = "YOUR_NETWORK_PASSWORD";
// Web Server on port 80
WiFiServer server(80);
// DHT Sensor
const int DHTPin = 5; // D1
// Initialize DHT sensor.
DHT dht(DHTPin, DHTTYPE);
// Temporary variables
static char celsiusTemp[7];
static char fahrenheitTemp[7];
static char humidityTemp[7];
// only runs once on boot
void setup() {
// Initializing serial port for debugging purposes
Serial.begin(115200);
delay(10);
dht.begin();
// Connecting to WiFi network
Serial.println();
Serial.print("Connecting to ");
Serial.println(ssid);
WiFi.begin(ssid, password);
while (WiFi.status() != WL_CONNECTED) {
delay(500);
Serial.print(".");
}
Serial.println("");
Serial.println("WiFi connected");
// Starting the web server
server.begin();
Serial.println("Web server running. Waiting for the ESP IP...");
delay(10000);
// Printing the ESP IP address
Serial.println(WiFi.localIP());
}
// runs over and over again
void loop() {
// Listenning for new clients
WiFiClient client = server.available();
if (client) {
Serial.println("New client");
// bolean to locate when the http request ends
boolean blank_line = true;
while (client.connected()) {
if (client.available()) {
char c = client.read();
if (c == '\n' && blank_line) {
// Sensor readings may also be up to 2 seconds 'old' (its a very slow sensor)
float h = dht.readHumidity();
// Read temperature as Celsius (the default)
float t = dht.readTemperature();
// Read temperature as Fahrenheit (isFahrenheit = true)
float f = dht.readTemperature(true);
// Check if any reads failed and exit early (to try again).
if (isnan(h) || isnan(t) || isnan(f)) {
Serial.println("Failed to read from DHT sensor!");
strcpy(celsiusTemp,"Failed");
strcpy(fahrenheitTemp, "Failed");
strcpy(humidityTemp, "Failed");
}
else{
// Computes temperature values in Celsius + Fahrenheit and Humidity
float hic = dht.computeHeatIndex(t, h, false);
dtostrf(hic, 6, 2, celsiusTemp);
float hif = dht.computeHeatIndex(f, h);
dtostrf(hif, 6, 2, fahrenheitTemp);
dtostrf(h, 6, 2, humidityTemp);
// You can delete the following Serial.print's, it's just for debugging purposes
Serial.print("Humidity: ");
Serial.print(h);
Serial.print(" %\t Temperature: ");
Serial.print(t);
Serial.print(" *C ");
Serial.print(f);
Serial.print(" *F\t Heat index: ");
Serial.print(hic);
Serial.print(" *C ");
Serial.print(hif);
Serial.print(" *F");
Serial.print("Humidity: ");
Serial.print(h);
Serial.print(" %\t Temperature: ");
Serial.print(t);
Serial.print(" *C ");
Serial.print(f);
Serial.print(" *F\t Heat index: ");
Serial.print(hic);
Serial.print(" *C ");
Serial.print(hif);
Serial.println(" *F");
}
client.println("HTTP/1.1 200 OK");
client.println("Content-Type: text/html");
client.println("Connection: close");
client.println();
// your actual web page that displays temperature and humidity
client.println("<!DOCTYPE HTML>");
client.println("<html>");
client.println("<head></head><body><h1>RobotSiam - Temperature and Humidity</h1><h3>Temperature in Celsius: ");
client.println(celsiusTemp);
client.println("*C</h3><h3>Temperature in Fahrenheit: ");
client.println(fahrenheitTemp);
client.println("*F</h3><h3>Humidity: ");
client.println(humidityTemp);
client.println("%</h3><h3>");
client.println("</body></html>");
break;
}
if (c == '\n') {
// when starts reading a new line
blank_line = true;
}
else if (c != '\r') {
// when finds a character on the current line
blank_line = false;
}
}
}
// closing the client connection
delay(1);
client.stop();
Serial.println("Client disconnected.");
}
}
ก่อนการอัพโหลดต้องแก้ไขโค้ด ตรงสีแดงให้ถูกต้องก่อน โดย
ssid = "ชื่อwifiที่ต้องการเชื่อมต่อ"
password = "รหัสผ่าน"
เลือก Port ในตัวอย่างเป็น "COM8"
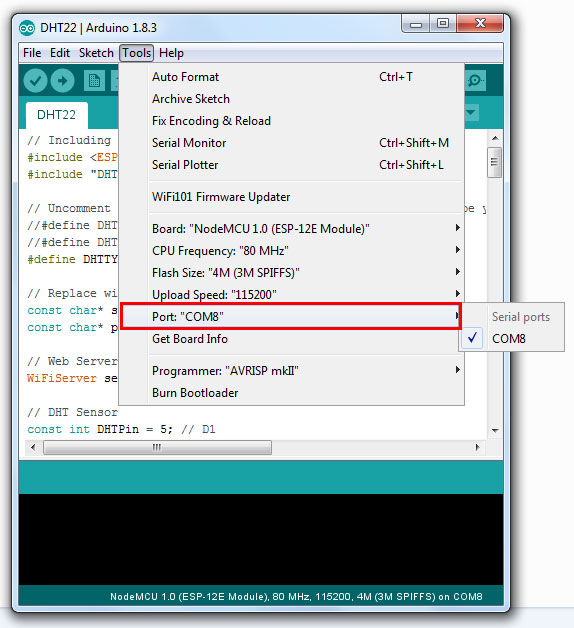
เลือก Board : NodeMCU 1.0 (ESP-12E Module)

อัพโหลด.... (ควรต่อไฟเข้า 9 โวลต์ ที่ขา VIN และ GND ขณะอัพโหลดด้วย)

รอจนกระทั่ง Done uploading. 100%

ไปที่ Serial Monitor

เลือก Both NL & CR และ เลือก 115200 baud

กดปุ่ม RST (อยู่ด้านล่างซ้ายมือ) 1 ครั้ง

Serial Monitor จะแสดง ไอพี ของ NodeMCU V3 ในตัวอย่างคือ 192.168.1.40

ไปที่ บราวเซอร์ ที่ URL ป้อน 192.168.1.40 ที่ได้จาก Serial Monitor ด้านบน
(ไอพีที่ได้แต่ละครั้งอาจจะไม่เหมือนกัน ให้ตรวจสอบทุกครั้ง)

เมื่อกลับไปดูที่ Serial Monitor จะ แสดงอุณหภูมิและความชื้น เพิ่มเข้ามา แสดงว่าโปรเจคของเรานั้นพร้อมทำงานแล้ว

6. ทดสอบการทำงานของโปรเจค
ถอดสาย USB จากคอมพิวเตอร์ ออกจาก NodeMCU V3

ไปที่ บราวเซอร์ ที่ URL ป้อน 192.168.1.40 ที่ได้จาก Serial Monitor ด้านบน
ใช้ ไดร์เป่าผม เป่าลมร้อน ไปที่ DHT22 กด F5 หรือ refresh บราวเซอร์ จะแสดง อุณหภูมิ ที่เพิ่มขึ้น และ เมื่อเปลี่ยนมาเป่าลมเย็น กด F5 หรือ refresh บราวเซอร์ ก็จะแสดง อุณหภูมิ ที่ลดลง

วีดีโอผลลัพธ์การทำงานของ โปรเจค NodeMCU V3 กับ DHT22 แสดงอุณหภูมิและความชื้น
ถอดสาย USB จากคอมพิวเตอร์ ออกจาก NodeMCU V3

ไปที่ บราวเซอร์ ที่ URL ป้อน 192.168.1.40 ที่ได้จาก Serial Monitor ด้านบน
ใช้ ไดร์เป่าผม เป่าลมร้อน ไปที่ DHT22 กด F5 หรือ refresh บราวเซอร์ จะแสดง อุณหภูมิ ที่เพิ่มขึ้น และ เมื่อเปลี่ยนมาเป่าลมเย็น กด F5 หรือ refresh บราวเซอร์ ก็จะแสดง อุณหภูมิ ที่ลดลง
