
ในโปรเจคนี้เราจะสร้างเว็บเซิร์ฟเวอร์ จาก Goouuu ESP32 สั่งเปิดปิดไฟ LED โดยใช้ เว็บบราวเซอร์ควบคุมผ่าน ระบบอินทราเน็ต ที่ใช้ WiFi หรือ วง แลน หรือใช้ เราเตอร์ เดียวกัน เท่านั้น
ESP32 เป็นชิปไอซีไมโครคอนโทรลเลอร์ 32 บิต ที่มี WiFi และบลูทูธเวอร์ชั่น 4.2 ในตัว ซึ่งเป็นรุ่นต่อของชิปไอซี ESP8266 ผลิตโดยบริษัท Espressif รองรับการเขียนโปรแกรมโดยใช้โปรแกรม Arduino IDE และรองรับไลบารี่ส่วนใหญ่ของ Arduino
อุปกรณ์ที่ใช้
1. Goouuu ESP32 Development Board WiFi+Bluetooth
2. Micro USB Cable Wire 1m for NodeMCU
3. Breadboard 8.5CM x 5.5CM 400 holes (โฟโต้บอร์ด)
4. Jumper (M2M) cable 10 cm
5. หลอดไฟ LED 5mm
1. ติดตั้ง Arduino core for ESP32
การจะใช้ ESP32 ได้นั้น จำเป็นต้องติดตั้ง Arduino core for ESP32 เพื่อ ทำการติดต่อ ระหว่าง Arduino IDE กับ ESP32
ลิงค์ : ขั้นตอนการติดตั้ง Arduino core for ESP32
.
ลิงค์ : เรียนรู้ การใช้งาน Goouuu ESP32 เบื้องต้น
https://robotsiam.blogspot.com/2017/09/hello-world-esp32.html
2. ประกอบวงจร
ประกอบ Goouuu ESP32 ลงบน Breadboard

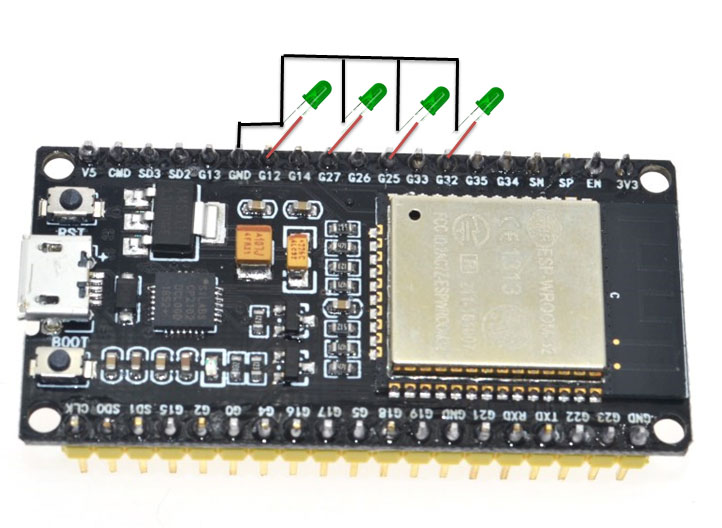
2.1 ต่อ Jumper (M2M) จากขา GND ของ ESP32 เข้ากับ ไฟ- Breadboard
2.2 ต่อ LED ตัวที่1 ขาที่ยาวกว่า เข้าที่ขา G12 ขาที่สั้น เข้าที่ ไฟ- Breadboard
2.3 ต่อ LED ตัวที่2 ขาที่ยาวกว่า เข้าที่ขา G27 ขาที่สั้น เข้าที่ ไฟ- Breadboard
2.4 ต่อ LED ตัวที่3 ขาที่ยาวกว่า เข้าที่ขา G25 ขาที่สั้น เข้าที่ ไฟ- Breadboard
2.5 ต่อ LED ตัวที่4 ขาที่ยาวกว่า เข้าที่ขา G32 ขาที่สั้น เข้าที่ ไฟ- Breadboard


เปิดโปรแกรม Arduino IDE ขึ้นมา เขียนโปรแกรม หรือ Sketch ตามโค้ดด้านล่างนี้
#include <WiFi.h>

ไปที่ Tools > Board เลือก "ESP32 Dev Module"


หากสามารถอัพโหลดโปรแกรมลงบอร์ดได้สำเร็จ จะแสดงคำว่า Done uploading. ที่แถบด้านล่าง

ไปที่เมนู Tool > Serial Monitor

เลือก Both NL & CR และ เลือก 115200 baud
Serial Monitor จะแสดง ไอพี ของ ESP32 ในตัวอย่างคือ 192.168.1.38

เปิดเว็บบราวเซอร์ ที่ URL ป้อนไอพีที่ได้จาก Serial Monitor ในตัวอย่างคือ 192.168.1.38
แล้วคลิกที่ here เพื่อทดสอบการ เปิดปิดไฟ LED


การประกอบวงจร
2.1 ต่อ Jumper (M2M) จากขา GND ของ ESP32 เข้ากับ ไฟ- Breadboard
2.2 ต่อ LED ตัวที่1 ขาที่ยาวกว่า เข้าที่ขา G12 ขาที่สั้น เข้าที่ ไฟ- Breadboard
2.3 ต่อ LED ตัวที่2 ขาที่ยาวกว่า เข้าที่ขา G27 ขาที่สั้น เข้าที่ ไฟ- Breadboard
2.4 ต่อ LED ตัวที่3 ขาที่ยาวกว่า เข้าที่ขา G25 ขาที่สั้น เข้าที่ ไฟ- Breadboard
2.5 ต่อ LED ตัวที่4 ขาที่ยาวกว่า เข้าที่ขา G32 ขาที่สั้น เข้าที่ ไฟ- Breadboard


3. อัพโหลดโปรแกรม
เชื่อมต่อสาย Micro USB ระหว่าง คอมพิวเตอร์ กับ ESP32

เปิดโปรแกรม Arduino IDE ขึ้นมา เขียนโปรแกรม หรือ Sketch ตามโค้ดด้านล่างนี้
#include <WiFi.h>
const char* ssid = "YOUR_NETWORK_NAME";
const char* password = "YOUR_NETWORK_PASSWORD";
WiFiServer server(80);
void setup()
{
Serial.begin(115200);
pinMode(12, OUTPUT); // set the LED pin mode
pinMode(27, OUTPUT); // set the LED pin mode
pinMode(25, OUTPUT); // set the LED pin mode
pinMode(32, OUTPUT); // set the LED pin mode
delay(10);
// We start by connecting to a WiFi network
Serial.println();
Serial.println();
Serial.print("Connecting to ");
Serial.println(ssid);
WiFi.begin(ssid, password);
while (WiFi.status() != WL_CONNECTED) {
delay(500);
Serial.print(".");
}
Serial.println("");
Serial.println("WiFi connected.");
Serial.println("IP address: ");
Serial.println(WiFi.localIP());
server.begin();
}
int value = 0;
void loop() {
WiFiClient client = server.available(); // listen for incoming clients
if (client) { // if you get a client,
Serial.println("New Client."); // print a message out the serial port
String currentLine = ""; // make a String to hold incoming data from the client
while (client.connected()) { // loop while the client's connected
if (client.available()) { // if there's bytes to read from the client,
char c = client.read(); // read a byte, then
Serial.write(c); // print it out the serial monitor
if (c == '\n') { // if the byte is a newline character
// if the current line is blank, you got two newline characters in a row.
// that's the end of the client HTTP request, so send a response:
if (currentLine.length() == 0) {
// HTTP headers always start with a response code (e.g. HTTP/1.1 200 OK)
// and a content-type so the client knows what's coming, then a blank line:
client.println("HTTP/1.1 200 OK");
client.println("Content-type:text/html");
client.println();
// the content of the HTTP response follows the header:
client.print("Click <a href=\"/12H\">here</a> to turn the LED on pin 12 on.<br>");
client.print("Click <a href=\"/12L\">here</a> to turn the LED on pin 12 off.<br>");
client.print("<br>");
client.print("Click <a href=\"/27H\">here</a> to turn the LED on pin 27 on.<br>");
client.print("Click <a href=\"/27L\">here</a> to turn the LED on pin 27 off.<br>");
client.print("<br>");
client.print("Click <a href=\"/25H\">here</a> to turn the LED on pin 25 on.<br>");
client.print("Click <a href=\"/25L\">here</a> to turn the LED on pin 25 off.<br>");
client.print("<br>");
client.print("Click <a href=\"/32H\">here</a> to turn the LED on pin 32 on.<br>");
client.print("Click <a href=\"/32L\">here</a> to turn the LED on pin 32 off.<br>");
client.print("<br>");
// The HTTP response ends with another blank line:
client.println();
// break out of the while loop:
break;
} else { // if you got a newline, then clear currentLine:
currentLine = "";
}
} else if (c != '\r') { // if you got anything else but a carriage return character,
currentLine += c; // add it to the end of the currentLine
}
// Check to see if the client request was "GET /xH" or "GET /xL":
if (currentLine.endsWith("GET /12H")) {
digitalWrite(12, HIGH); // GET /H turns the LED on
}
if (currentLine.endsWith("GET /12L")) {
digitalWrite(12, LOW); // GET /L turns the LED off
}
if (currentLine.endsWith("GET /27H")) {
digitalWrite(27, HIGH); // GET /H turns the LED on
}
if (currentLine.endsWith("GET /27L")) {
digitalWrite(27, LOW); // GET /L turns the LED off
}
if (currentLine.endsWith("GET /25H")) {
digitalWrite(25, HIGH); // GET /H turns the LED on
}
if (currentLine.endsWith("GET /25L")) {
digitalWrite(25, LOW); // GET /L turns the LED off
}
if (currentLine.endsWith("GET /32H")) {
digitalWrite(32, HIGH); // GET /H turns the LED on
}
if (currentLine.endsWith("GET /32L")) {
digitalWrite(32, LOW); // GET /L turns the LED off
}
}
}
// close the connection:
client.stop();
Serial.println("Client Disconnected.");
}
}
ก่อนการอัพโหลดต้องแก้ไขโค้ด ตรงสีแดงให้ถูกต้องก่อน โดย
const char* ssid = "ชื่อwifiที่ต้องการเชื่อมต่อ";
const char* password = "รหัสผ่าน";

ไปที่ Tools > Board เลือก "ESP32 Dev Module"

ไปที่ Tool > Port แล้วเลือกพอร์ตที่ปรากฏ (กรณีใช้เครื่องคอมพิวเตอร์ที่มี COM Port ให้เลือกตัวอื่นที่ไม่ใช่ COM1)
ในตัวอย่างเลือกเป็น "COM12"
ในตัวอย่างเลือกเป็น "COM12"

กดปุ่ม  เพื่ออัพโหลด
เพื่ออัพโหลด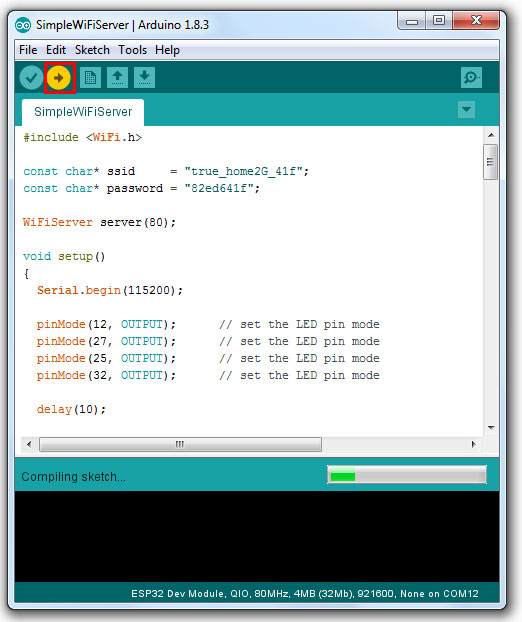
หากสามารถอัพโหลดโปรแกรมลงบอร์ดได้สำเร็จ จะแสดงคำว่า Done uploading. ที่แถบด้านล่าง

ไปที่เมนู Tool > Serial Monitor

เลือก Both NL & CR และ เลือก 115200 baud
Serial Monitor จะแสดง ไอพี ของ ESP32 ในตัวอย่างคือ 192.168.1.38

4. ทดสอบการทำงาน
เปิดเว็บบราวเซอร์ ที่ URL ป้อนไอพีที่ได้จาก Serial Monitor ในตัวอย่างคือ 192.168.1.38
แล้วคลิกที่ here เพื่อทดสอบการ เปิดปิดไฟ LED

