
WiFi ถือเป็นหัวใจสำคัญและเป็นจุดเด่นของ ESP32 เลยก็ว่าได้ ด้วยการรวมส่วนของ WiFi มาในชิปพร้อมกับไมโครคอนโทรลเลอร์ทำให้สามารถประหยัดพื้นที่โดยรวมของระบบได้ รวมทั้งทำให้สามารถจัดการเรื่องของพลังงานได้ง่ายมากยิ่งขึ้น นอกจากนี้การใช้งาน โดยมีคุณสมบัติพิเศษคือสามารถเลือกโหมดการใช้งาน WiFi ได้ 3 โหมด คือ โหมด AP (Access Point) โหมด STA (Station) และโหมด AP+STA ซึ่งทั้ง 3 โหมดจะมีการใช้งานที่แตกต่างกันเล็กน้อย โดยในโปรเจคนี้ จะเลือกการใช้งาน ในโหมด STA (Station)
โหมด STA
STA ย่อมาจาก Station เป็นโหมดที่จะใช้ DevKitC ESP32 ไปเชื่อมต่อกับอุปกรณ์ปล่อยสัญญาณอื่น ๆ เช่น เร้าเตอร์ โทรศัพท์มือถือที่เปิดฮอตสปอต การใช้งานในโหมดนี้นิยมใช้กับงานที่ต้องการเชื่อมต่ออินทราเน็ต หรือมีการสื่อสารกับอุปกรณ์หลาย ๆอย่าง ในวงแลน
ในงานด้าน IoT Smart Home และ Smart Farm มักใช้งานในโหมดนี้เพื่อส่งข้อมูลจากเซ็นเซอร์ขึ้นไปบนระบบคลาวด์และใช้โหมดนี้เพื่อเชื่อมต่อกับระบบคลาวด์รับคำสั่งมีสั่งอุปกรณ์ต่าง ๆ ให้ทำงานผ่านอินทราเน็ต
หุ่นยนต์ควบคุมด้วยเว็บบราวเซอร์
หากต้องการใช้งานอินเตอร์เน็ต-อินทราเน็ต หรือต้องการให้อุปกรณ์หลาย ๆ ตัวสามารถเข้ามาสื่อสารได้ จำเป็นต้องใช้งานในโหมด STA เพื่อให้ Access Point เป็นอุปกรณ์ตัวกลางในการสื่อสาร
โดยในโปรเจคนี้เราจะสร้างเว็บเซิร์ฟเวอร์ จาก DevKitC ESP32 และ และ สั่งควบคุมหุ่นยนต์ จาก เว็บบราวเซอร์ ผ่านทาง ระบบอินทราเน็ต ที่ใช้ WiFi หรือ วง แลน หรือใช้ เร้าเตอร์ เดียวกัน เท่านั้น
### อุปกรณ์ที่ใช้ ###
1 . 4WD Smart Robot Car Chassis Kits
2. DevKitC V2 ESP32 Development Board
3. Micro USB Cable Wire 1m
4. Breadboard 8.5CM x 5.5CM 400 holes // จำนวน 2 ชิ้น
5. Motor Driver Module L298N
6. สกรูหัวกลม+น็อตตัวเมีย ขนาด 3มม ยาว 12มม
7. Jumper 20cm Male to Male
8. Jumper 20cm Female to Male
9. เพาเวอร์สวิตซ์สำหรับเปิดปิด
10. รางถ่าน 18650 แบบ 2 ก้อน
11. ถ่านชาร์จ 18650 Panasonic NCR18650B 3.7v 3400mAh // จำนวน 2 ก้อน
...
โดยการทำโปรเจคมีขั้นตอนดังนี้
1.ติดตั้ง Arduino core for ESP32
ลิงค์การติดตั้ง Arduino core for ESP32
https://robotsiam.blogspot.com/2017/09/arduino-core-for-esp32.html
2.ประกอบหุ่นยนต์ DevKitC ESP32
ลิงค์การประกอบหุ่นยนต์ DevKitC ESP32
https://robotsiam.blogspot.com/2017/11/esp32-4.html
3.ทดสอบการเคลื่อนที่ของหุ่นยนต์
ลิงค์ทดสอบการเคลื่อนที่ของหุ่นยนต์
https://robotsiam.blogspot.com/2017/11/esp32-5-gpio-devkitc.html
4.เขียนโค้ดควบคุมหุ่นยนต์
เชื่อมต่อสาย Micro USB ระหว่าง คอมพิวเตอร์ กับ DevKitC ESP32

เปิด โปรแกรม Arduino IDE ขึ้นมา เขียนโปรแกรม หรือ Sketch ตามโค้ดด้านล่างนี้
/*
Robot with DevKitC ESP32.
For more details visit:
http://www.robotsiam.com
*/
#include <WiFi.h>
const char* ssid = "YOUR_NETWORK_NAME";
const char* password = "YOUR_NETWORK_PASSWORD";
WiFiServer server(80);
// Motor A pins
int pinA2 = 12;
int pinA1 = 13;
//Motor B pins
int pinB2 = 32;
int pinB1 = 33;
void setup()
{
Serial.begin(115200);
pinMode(pinA1, OUTPUT);
pinMode(pinA2, OUTPUT);
pinMode(pinB1, OUTPUT);
pinMode(pinB2, OUTPUT);
delay(10);
// We start by connecting to a WiFi network
Serial.println();
Serial.println();
Serial.print("Connecting to ");
Serial.println(ssid);
WiFi.begin(ssid, password);
while (WiFi.status() != WL_CONNECTED) {
delay(500);
Serial.print(".");
}
Serial.println("");
Serial.println("WiFi connected.");
Serial.println("IP address: ");
Serial.println(WiFi.localIP());
server.begin();
}
int value = 0;
void loop() {
WiFiClient client = server.available(); // listen for incoming clients
if (client) { // if you get a client,
Serial.println("New Client."); // print a message out the serial port
String currentLine = ""; // make a String to hold incoming data from the client
while (client.connected()) { // loop while the client's connected
if (client.available()) { // if there's bytes to read from the client,
char c = client.read(); // read a byte, then
Serial.write(c); // print it out the serial monitor
if (c == '\n') { // if the byte is a newline character
// if the current line is blank, you got two newline characters in a row.
// that's the end of the client HTTP request, so send a response:
if (currentLine.length() == 0) {
// HTTP headers always start with a response code (e.g. HTTP/1.1 200 OK)
// and a content-type so the client knows what's coming, then a blank line:
client.println("HTTP/1.1 200 OK");
client.println("Content-type:text/html");
client.println();
// the content of the HTTP response follows the header:
client.print("<h1>");
client.print("<br>");
client.print("Click <a href=\"/FORWARD\">FORWARD</a>.<br>");
client.print("<br>");
client.print("Click <a href=\"/BACKWARD\">BACKWARD</a>.<br>");
client.print("<br>");
client.print("Click <a href=\"/TURNLEFT\">TURNLEFT</a>.<br>");
client.print("<br>");
client.print("Click <a href=\"/TURNRIGHT\">TURNRIGHT</a>.<br>");
client.print("<br>");
client.print("</h1>");
// The HTTP response ends with another blank line:
client.println();
// break out of the while loop:
break;
} else { // if you got a newline, then clear currentLine:
currentLine = "";
}
} else if (c != '\r') { // if you got anything else but a carriage return character,
currentLine += c; // add it to the end of the currentLine
}
// Check to see if the client request was "GET /xH" or "GET /xL":
if (currentLine.endsWith("GET /FORWARD")) {
forward(400);
coast(1);
}
if (currentLine.endsWith("GET /BACKWARD")) {
backward(400);
coast(1);
}
if (currentLine.endsWith("GET /TURNLEFT")) {
turnLeft(1000);
forward(10);
coast(1);
}
if (currentLine.endsWith("GET /TURNRIGHT")) {
turnRight(1000);
forward(10);
coast(1);
}
}
}
// close the connection:
client.stop();
Serial.println("Client Disconnected.");
}
}
//ฟังก์ชั่นหลักในการควบคุมมอเตอร์
void forward(int time)
{
motorAForward();
motorBForward();
delay(time);
}
void backward(int time)
{
motorABackward();
motorBBackward();
delay(time);
}
void turnLeft(int time)
{
motorABackward();
motorBForward();
delay(time);
}
void turnRight(int time)
{
motorAForward();
motorBBackward();
delay(time);
}
void coast(int time)
{
motorACoast();
motorBCoast();
delay(time);
}
void brake(int time)
{
motorABrake();
motorBBrake();
delay(time);
}
//ฟังก์ชั่นรองในการควบคุมมอเตอร์
//motor A controls
void motorAForward()
{
digitalWrite(pinA1, HIGH);
digitalWrite(pinA2, LOW);
}
void motorABackward()
{
digitalWrite(pinA1, LOW);
digitalWrite(pinA2, HIGH);
}
//motor B controls
void motorBForward()
{
digitalWrite(pinB1, HIGH);
digitalWrite(pinB2, LOW);
}
void motorBBackward()
{
digitalWrite(pinB1, LOW);
digitalWrite(pinB2, HIGH);
}
//coasting and braking
void motorACoast()
{
digitalWrite(pinA1, LOW);
digitalWrite(pinA2, LOW);
}
void motorABrake()
{
digitalWrite(pinA1, HIGH);
digitalWrite(pinA2, HIGH);
}
void motorBCoast()
{
digitalWrite(pinB1, LOW);
digitalWrite(pinB2, LOW);
}
void motorBBrake()
{
digitalWrite(pinB1, HIGH);
digitalWrite(pinB2, HIGH);
}
ก่อนการอัพโหลดต้องแก้ไขโค้ด ตรงที่เป็นสีแดงให้ถูกต้องก่อน โดย
"YOUR_NETWORK_NAME" คือ ชื่อWiFiที่ต้องการเชื่อมต่อ
"YOUR_NETWORK_PASSWORD" คือ รหัสผ่าน

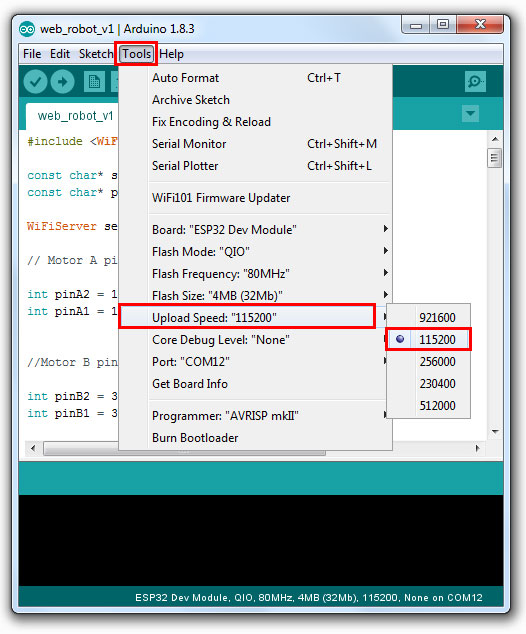
ไปที่ Tools -> Board เลือก "ESP32 Dev Module"

ไปที่ Tools -> Port แล้วเลือกพอร์ตที่ปรากฏ (กรณีใช้เครื่องคอมพิวเตอร์ที่มี COM Port ให้เลือกตัวอื่นที่ไม่ใช่ COM1)
ในตัวอย่างเลือกเป็น "COM12"

ไปที่ Tools -> Upload Speed : เลือกเป็น "115200"
กดปุ่ม
 เพื่ออัพโหลด
หากสามารถอัพโหลดโปรแกรมลงบอร์ดได้สำเร็จ จะแสดงคำว่า Done uploading. ที่แถบด้านล่าง

ไปที่ Tools -> Serial Monitor

เลือก Both NL & CR และ เลือก 115200 baud
Serial Monitor จะแสดง ไอพี ของ DevKitC ESP32 ในตัวอย่างคือ 192.168.1.40

5.ทดสอบการทำงาน
ใสถ่าน แบบ 18650 แรงดันไฟเฉลี่ย 3.7V (3400 mAh) จำนวน 2 ก้อน

เปิด เว็บบราวเซอร์

ที่ URL ป้อนไอพีที่ได้จาก Serial Monitor ในตัวอย่างคือ 192.168.1.40
แล้วคลิก ทดสอบการทำงาน
แล้วคลิก ทดสอบการทำงาน

วีดีโอผลลัพธ์ หุ่นยนต์ควบคุมด้วยเว็บบราวเซอร์ DevKitC ESP32